4 min
This article shows you how to fit the whole picture on Instagram. If you have a full portrait (9:16) image or video or a landscape (16:9) image or video, you can fit the whole picture in your Instagram post by following this tutorial.
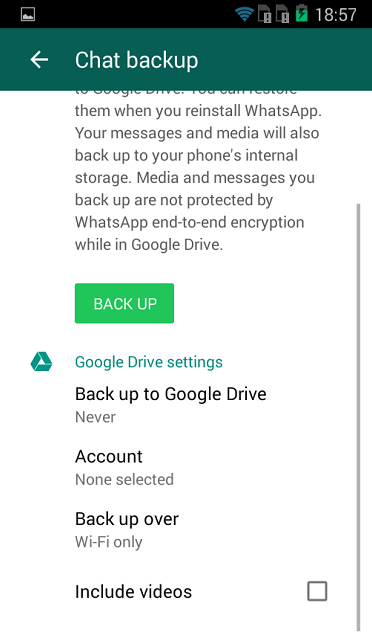
Instagram has a maximum aspect ratio of 4:5 on portrait posts (four pixels wide for every five pixels tall). Instagram’s restriction reduces the number of very tall images that take up a lot of vertical space in the feed. Although it’s nice that Instagram keeps users from publishing massive, obtrusive posts, the 4:5 limit makes it difficult to post a whole vertical picture or video that you shot on your phone.
Here's what your tall photos will look like on Instagram without added borders.If you want to fit your whole picture on Instagram but it is taller than the 4:5 aspect ratio, you need to modify your image before posting. Otherwise, Instagram will automatically crop your image to a maximum of 4:5. I recommend the Kapwing resizer as it allows you to add white space on either side to bring your image to the required aspect ratio. In this article, I’ll explain how to fit the whole picture on Instagram in three simple steps:
Start by opening the Kapwing’s Resizer tool on your phone or computer. Upload your image file from camera roll or import it from a URL. Kapwing supports images, videos, and GIFs, so you can use it to resize for any kind of media.
The video resizer tool in KapwingOnce your picture loads into the editor, you’ll be taken into the Kapwing Studio Editor where you'll see a preview of your image in the center of the screen.
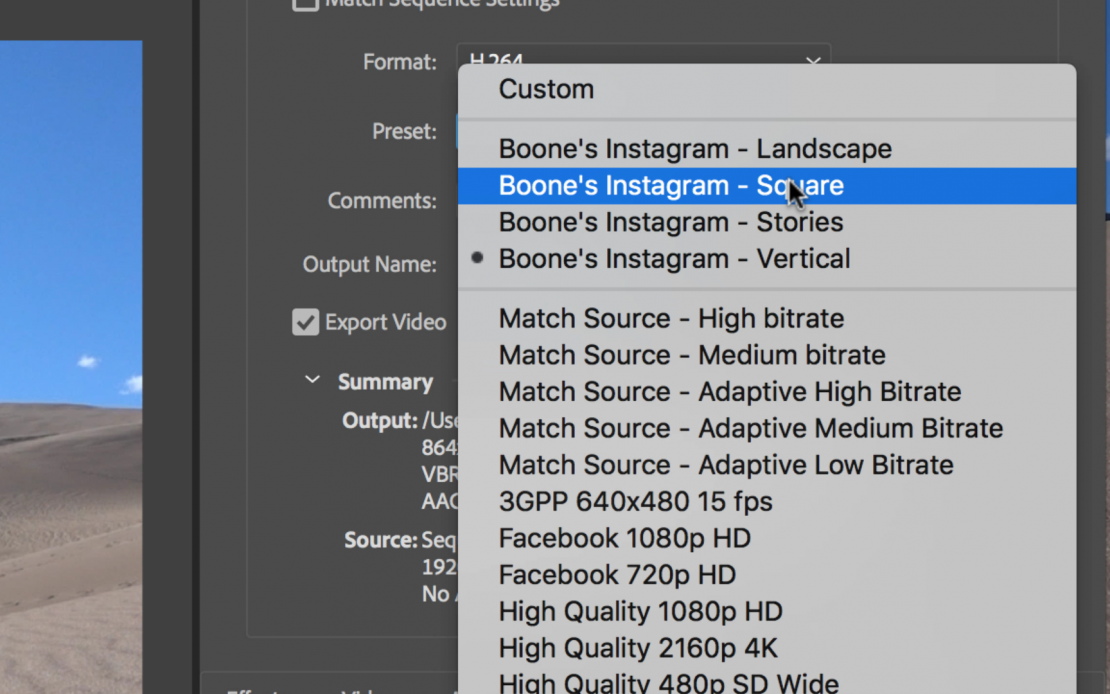
In the Output Size section, select the 4:5 option. This allows your photo to take up maximum vertical space in the Instagram feed without getting sized down. There is a resizing option for Instagram, 1:1, but this shrinks your image to fit in the default square shape.
Resize the image to 4:5 using the button in the Output Size listOnce you have selected the size option, Kapwing adds white padding to either side of your image to make it fit the 4:5 aspect ratio. You can change this white background to any color you want so that it stands out in the Instagram feed.
Click the red Export Image button at the top of the screen. After a few moments of processing, Kapwing makes your resized 4:5 picture or video available for download. Whether you're using a desktop computer, iPhone, Android, or tablet you'll be able to instantly download the image to your photo gallery once published.
If you're not signed into a Kapwing account, sign in or sign up using your Google or Facebook account – once you've signed into a Kapwing account, the watermark in the lower right corner will be removed from your final image.
Open the Instagram app and upload your picture. You’ll notice that Instagram crops the picture to square by default, but you can click the expand arrows or pinch the image in the lower left to fit the whole picture on Instagram. When you publish it, Instagram will resize to image width to fit the screen, the white image background will blend in with Instagram’s white background, and your whole picture will appear on Instagram with no cropping.
Note: You can also choose a black background, if you and your followers use Instagram in Dark Mode.
This tutorial shows you a workaround for posting full portrait pictures and videos on Instagram. You can use Kapwing’s Resizer to post multiple images with different sizes on Instagram, add a thin white border around your media, and publish TikTok and Snap videos. I hope that it helps speed up your social media workflow and enables you to post your beautiful and fun candid moments to Instagram.
For more information on how to resize a video for Instagram, check out this video tutorial (we give you the best sizes for each type of video too!):
Check back in at the Kapwing Resources page or our YouTube channel for other content creation tips and tutorials! And remember to tag us @KapwingApp whenever you share your content on social media– we love to see what our creators are passionate about!
Related Articles:
3 min
Instagram crops all vertical posts to a 4:5, which means part of a vertical video or photo is cut off.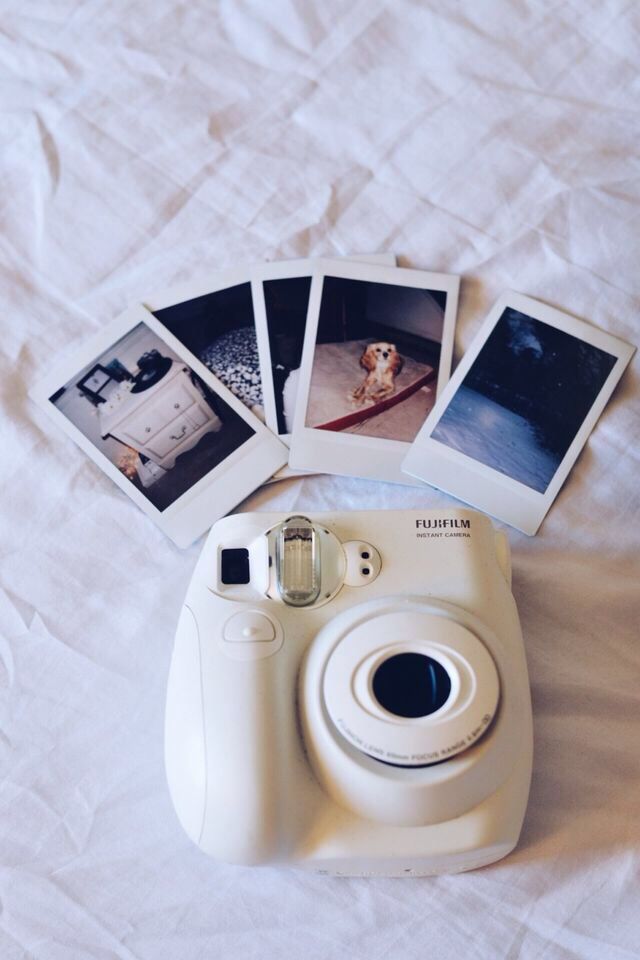 But, if you add a white background before publishing to Instagram, you can post the full 9:16 portrait without cropping.
Instagram crops all vertical posts to a 4:5. Unless your video is under 30 seconds, it won't work on Reels. That means that it’s impossible to fit a full 9:16 video into a normal Instagram video post. If you take a screenshot, film a video clip on your phone, TikTok, or Snap, or if you want to post a Story to your feed, Instagram makes you crop part of it out unless you resize it first.
A portrait video is cropped to 4x5 aspect ratioTo post a full vertical video or image on Instagram without cropping to 4:5, add a white background to make it into a square. Then, you can post the photo or video without cropping out or changing the size. This technique works for pictures, GIFs, and videos. Here’s a step-by-step tutorial:
Open Kapwing’s resizer and upload the vertical or portrait photo you want to post. Kapwing’s resizer is free to use and online, so you don’t need to download an app. It supports images, GIFs and videos.
Kapwing's Resizer is quick and intuitive, even for beginners.Note: If you want to edit or add filters to your photos, make sure to do this before resizing. That way, the white background won’t be affected by the color changes and adjustments.
Choose the 1:1 option for Instagram (Kapwing also supports 16:9 sizing for YouTube and other formats). You can change the background color and use Kapwing’s zoom and positioning tools to zoom in, crop, or add a border. Click “Export Image” once the preview matches what you want your post to look like!
To take up more vertical space in the Instagram feed, you can also choose to resize your post to 4:5 (the “FB/Twitter Portrait” option on Kapwing).
After a few moments, your image or video will be ready for download – you can remove the Kapwing watermark for free by signing into your account. Since your photo/video now has a 1:1 aspect ratio, you can now download and publish it without cropping on Instagram.
If you're not signed into a Kapwing account, sign in or sign up using your Google or Facebook account – once you've signed into a Kapwing account, the watermark in the lower right corner will be removed from your final image.
Steps for saving the image on iPhonesI hope this article helps you share your un-cropped vertical videos and portrait photos with the world! Kapwing’s one-click editor was designed for people with no previous editing expertise, so don’t be afraid to try it out.
For more information on how to resize a video for Instagram, check out this video tutorial:
For more ideas, tutorials, and features, check back in at the Kapwing Resources page or our YouTube channel! And remember to tag us @KapwingApp whenever you share your content on social media– we love to see what our creators are passionate about!
Related Articles:
Table of contents:
It's no secret that social networks are different. For some, the desktop version is the main one, while others mainly exist as an application. And this specificity greatly affects the frames in which the images we upload fit. Computer social networks have much more opportunities in this regard. It's not just about the size, it's also about the fact that computer screens are bigger and can give you a better view of your photos. For Instagram, as a service for phones, it is important to know the conditions that must be taken into account in order to create and post photos that are ideal for mobile screens. Let's talk about how to reduce a photo for Instagram.
In the past, people had to be very strict about pictures for publication. The original format of the posts was a photo from a Polaroid, a small instant camera: a square image and a border, and it was thicker at the bottom. People took pictures as a souvenir and gave them, signing their wishes below. Doesn't it remind you of anything?
Now, of course, the square format remains the main one, but such cropping is optional. You can, spreading and pinching your fingers in the picture, increase or decrease it. But, if you increase it, be prepared to cut off what will not be included in the “frame” - in this case, the publication will be exactly square.
Although it is possible to fit the image to the publication, most of the time users on a social network spend viewing posts, which means that it is important to be able to use the features of social networks for viewing.
Is it possible for us to enlarge the picture in order to see all the details? Yes. This feature has been added in recent updates. It is enough to spread two fingers in the picture to enlarge the image. If you fix your fingers and move around the screen at the same distance from each other, you can also move the photo to see certain parts of it without changing the size anymore.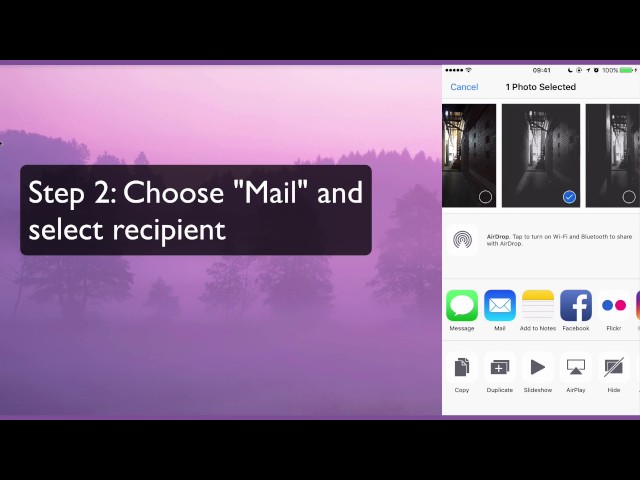
As I wrote above, restrictions are imposed on users on Instagram. But now the trend is such that the framework is less and less. Previously, the social network constantly cropped uploaded photos, fitting them to the format. Now this is no longer the case, but there are still some limits.
The question is not so much about image quality in the literal sense - the maximum resolution is 1080 by 1080 for a square post and 1080 by 1350 for a vertical one. Much more important is the aspect ratio. The square entry has a ratio of 1 to 1, which is logical. Horizontal - 1.9to 1 and vertical to 4 to 5. Anything that doesn't match this will be clipped.
If this article was written in 2015, then I would give you a whole selection of applications that supposedly allow you to add "full-length" photos. But often such applications could only harm. Some of them made it possible to make an image square by adding white borders to a vertical one. Others, like many other fraudulent tools, either asked for money for zero functionality, or hacked pages. Perhaps it was this kind of fraud that provoked the introduction of the ability to upload vertical and horizontal images. Now it’s not necessary to google “How to reduce a photo for Instagram?”, Because there are now corresponding opportunities in the social network itself.
You need to do the following:
As you understand, cropping photos for Instagram in third-party tools is now essentially useless - why, if there are built-in features, and even if the aspect ratio is not suitable, the social network itself is fix. But this is sometimes not very convenient - cropping may be needed more serious than what Insta offers.
Therefore, I can offer the following tools to solve the question “How to enlarge and crop a photo on Instagram?”
The use of social networks requires knowledge of the interface, functionality and, importantly, the restrictions imposed on users. Some of the most tangible frames affect images. Although the photo grid empowers people in this regard, cropping is often still necessary.
#1. The resolution of my photo is small, so Instagram stretches it, which makes the image blurry. What to do?
One solution to this problem is to add white borders. This way you can leave the original resolution.
#2. How to download full size photo carousel?
At the moment there is no such functionality in the social network. If a series, then square pictures.
#3. How to upload an image without cropping through a computer? Doesn't work in browser.
For the full functionality of the social network through a PC, you will need to install the Bluestacks emulator or some of its analogues.
To ask your question or express your opinion - write in the comments. And also watch a helpful video on the topic.
[Total: 13 Average: 1.5/5]
Like the content? Share with your friends!
2521
9
9 Read Min
How to shrink a photo for Instagram
Would you like to post on Instagram a photo saved in the Gallery of your smartphone, but before continuing in this sense, do you want to reduce it to ensure optimal display in your publication or in your history? Well, I don't understand what you are waiting for...go ahead! How do you say? You've never done anything like this, don't you know how to do it? No problem, if you want, I can explain it to you.
In fact, if you give me a few minutes of your valuable time, I can personally illustrate you in a simple way, but not for lack of detail. how to reduce photo for instagram . I immediately assume that this can be done using a special feature built into the Instagram app to Android and iPhone or, if you prefer, resorting to using third-party image editing solutions. In all cases, don't worry, you won't have to do anything too complicated.
So? How about putting the conversations aside and getting busy right away? Yeah? Perfect. Sit back, take a few minutes for yourself, and focus on the following information. I am sure that, in the end, you will be able to say to yourself more than satisfied with the results. Let it be?
Index
 1 Send
 If you are interested in understanding how to reduce a photo on Instagram will act directly from the official social network app for Android (also available in alternative stores) and iOS so that it can later be published in Enviar or inside your Stories , the instructions you need to follow are below. As suggested at the beginning of the article, there is nothing to worry about, it is not difficult.
If you want to take a smaller instagram photo Why do you want to post it in Enviar , Open social network app on your mobile phone, and after the main screen is displayed, log in to your account (if necessary), then press the button (+) located at the bottom and select photo is present in the Gallery of your mobile phone that you want to publish on the Internet.
This will show you a preview of the selected photo at the top of the screen, which will automatically be resized by Instagram: to reduce it, you can simply use pinch to increase ; so touch it with two fingers and then pinch them together to adjust the zoom level of the image to suit your needs. If you want to fully zoom out, you can also press the button with two arrows which is in the lower left corner of the photo.
When you're done, click Forward located in the upper right corner, apply (if desired) any other changes to the image by setting a filter and making other changes related to brightness, contrast, etc. (using the options specified in the sections filter mi edit ) and click on the element again forward , in the upper right corner.
Once this is done, enter a single subtitle an attached image describing the content of the post you are publishing; decide whether to tag other Instagram users or add a location, choose whether to post the photo also on to another social network (Facebook, Twitter or Tumblr) by moving the appropriate levers OFF un EN and click on Share (above) to continue posting photos to your Instagram feed.
If, on the contrary, you want to reduce the photo for Instagram because you want to publish it in story , first open the famous application on your device and press the camera icon located in the upper left corner or in the thumbnail of your avatar with the button (+ ) next to it is on the main screen of the application.
Then make sure the option is selected at the bottom of the proposed new screen. history (otherwise you can by sliding the screen) and press white round button placed in the center to take a picture at the moment. If, on the other hand, you want to take a photo from the gallery, tap promotion which is in the bottom left corner, and select photo of your interest.
At this point, Instagram will automatically resize the selected image to fit perfectly on the story screen: to make it smaller, all you have to do is use is pinched to zoom in on , so you need to place two fingers on it and then close them until the image zooms out to suit your needs.
After reducing the size of the photo, if you want, make further changes using the buttons at the top: the icon with the face with the stars allows you to apply filters and effects, the one with the sticker allows you to insert gifs, stickers, music tracks, etc. , the one with stretch this allows you to draw while the icon A.A. allows you to insert your own text.
To complete and continue posting the story, click on the button Send to which is in the bottom right corner and decide whether to share the story on Instagram and possibly also on Facebook or only with close friends by clicking on the corresponding button Share present on the next screen.
As I said at the beginning of the guide, if you want, you can reduce the photo for instagram also resorting to using Third Party Applications . If you're interested, here are some of the best custom solutions you can trust.
Google Photos is a free backup application of the Internet search giant's eponymous service. Automatic online viewing of images (and videos) presented in the Gallery, as well as a photo viewer and editor.
It is pre-installed in the most recent Android production terminals (otherwise you can get it from the corresponding section of the Play Store), and on the iPhone you always need to download it from the App Store by pressing the button get so on this Install on PC and allow it download using Face ID , Touch ID O password dellApple ID ..
After launching the Google Photos app, select Image which you want to intervene from section photo (If you don't see it, you can find it in the albums by going to section Colección or you can search by keywords, places, actions, etc. access the section Study ).
At this point, press the button with cursors placed at the bottom and if you are using Android , press the option separate at the bottom of the screen and tap the icon with rectangle and sharp corners which you will find below; if you are using iOS instead tap the icon Cortador and then the one with dotted rectangle inside .
Then select the resizing option you prefer from the menu that appears. Also, you can resize the photo yourself by moving the selection rectangle visible on the image. Optionally, you can also zoom out on the photo in the selection area using pinch to enlarge , that is, put two fingers on the image and then close them.
When the changes are made, touch the element Fine and / or in this save and decide whether to save the changes in the current image or if to create a new copy of the same and that's it. Subsequently, proceed to post photos to Instagram by following the instructions I gave you earlier.
If you are using iPhone , you can zoom out photo for Instagram also using photo app which is the default iOS to view, manage and edit photos on your device. In fact, the application also integrates editing tools with which you can reduce the size of images, rotate them, etc.
To use it for your own purposes, select icon Photos application (with colorful flower on a white background ) what you will find in start screen I am in Library app with iOS and tap photo you want to post to Instagram, which you will find in library . If you can't find the photo you are interested in, you can find it in a specific album in section Album or you can try searching for it by keywords, categories, etc. access section search .
Once you have opened the photo you are interested in, tap it edit is present at the top right, then on the button with Cortador below. Then click the button with i rectangles located in the upper right corner and select one of the Preset available below to resize the image. You can also freely resize the photo by moving the selection rectangle visible on the screen.
If necessary, you can also zoom out in the selection area using pinch to zoom in , then touch the image with two fingers and bring them together.
Once you've made your changes, tap Penalty in the bottom right corner to save your changes, then start posting your photo to Instagram following the instructions I gave you at the beginning of the tutorial.
Photo Shrink Applications What I have already told you hasn't convinced you in a certain way and so you would like me to suggest some alternative solutions ? I will correct you right away.