Cloudwards.net may earn a small commission from some purchases made through our site. However, any affiliate earnings do not affect how we review services.
Table of Contents
↑
Facebook and privacy are two mutually exclusive concepts, but there are some Facebook privacy settings you can tweak to make your social media experience a little less invasive. Keep reading to learn more.
By Aleksander Hougen (Managing Editor)
— Last Updated: 2022-09-29T01:17:59+00:00 Facts checked by Elisabeth Ivey
If you’re concerned with online privacy, your best bet is to delete your social media accounts and never look back. That said, if you’re not willing to go quite that far, there are some privacy and security settings you can play with to make your Facebook account more private. In this guide to Facebook privacy settings, we’ll cover everything you need to know.
There are a bunch of different privacy options inside Facebook’s settings panel, and navigating them all can be somewhat confusing. What makes this even worse is that Facebook changes these settings relatively frequently, so here we’ll take a look at the steps needed to navigate the new Facebook privacy settings.o

Although these steps will make your Facebook profile a bit more locked down, the only way to truly protect your privacy from social media giants is to get rid of your accounts altogether. If that’s something you want to do, you can check out our guides on how to delete Facebook and how to delete Instagram.
11/03/2021 Facts checked
Updated guide to reflect changes in the Facebook privacy settings, added information about Facebook removing facial recognition software, and replaced the images.
There are a lot of different privacy settings you can change on your Facebook account. It’ll never be completely private, but if you follow this guide you’ll lock down your profile as much as you possibly can.
Although it’s possible to change some privacy settings on the Facebook mobile app, we recommend using the browser, as you won’t have access to the full range of privacy options otherwise.
That depends on your level of comfort with online privacy violations and social media in general. If you want to keep your Facebook account but also limit how much data about you is out there, we recommend following all the steps in this guide and changing all the settings to “only me.”
Before we dive into the advanced privacy settings that Facebook lets you adjust, let’s first do a quick security roundup to make sure that your account is safe from any unauthorized access.
We’ll be using a web browser for these instructions, as it’s the easiest way to adjust all of your settings, but you can also use the Facebook app for some of them.
The first step to keeping any account secure is to make sure you have a strong password. You can do this in a couple of different ways, either by using a password manager, or by simply following some basic password best practices such as using numbers, symbols and both uppercase and lowercase letters. A long password is also preferable to a short one.
If you’re not sure whether your password is strong, you can check its strength or generate a highly secure password using our password generator. Once you have a secure password ready, here’s how you can change your existing Facebook password.
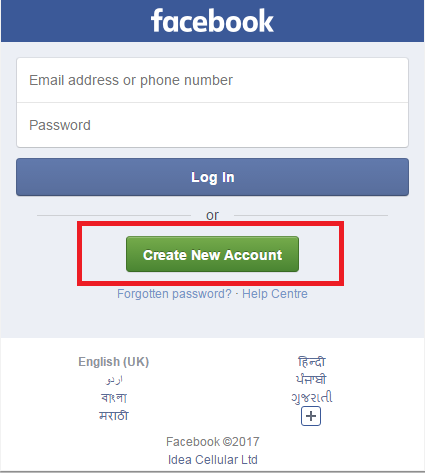
Go to facebook.com and log in to your account using your credentials.
Once you’re logged in, click on the arrow in the top-right corner of the screen, select “settings & privacy,” then “settings. ”
”
Click on “security and login” in the menu on the left side of the screen. Scroll down to the entry called “change password” in the “login” section. Click on it, then enter your current password as well as your new (hopefully stronger) password.
Sometimes not even a strong password is enough to keep your account safe. No matter how strong it is, if someone else gets a hold of your password, there’s nothing stopping them from logging into your account. The solution to this is two-factor authentication, which adds an extra layer of security. Here’s how you enable 2FA for Facebook.
Navigate to facebook.com in the web browser of your choice and log in using your email and password.
Click the arrow in the top-right corner of the screen, then select “settings & privacy” followed by “settings. ”
”
You can now choose between receiving an SMS whenever you try to log in or using a third-party 2FA app or device to authenticate yourself. Click the option you’d like and follow the setup instructions.
If you’re not quite sure what measures you need to take to improve your account’s security, Facebook provides a security checkup feature that checks it all and lets you know if there are any improvements to be made. Here’s how you access it.
As usual, the first step is to go to facebook.com and log in using your account credentials.
Click on the arrow in the top-right corner and select “settings & privacy” and then “settings.”
Select “security and login” in the menu on the left side of the screen. Click on the button at the top of the page that says “check your important security settings.”
Once in the security check, the first thing you’ll see is an overview of your security settings, as well as recommendations for improving them. You can now click “continue” and follow the instructions to make any of the recommended changes.
Now that we’ve covered the security side of things, let’s dive into how you can maximize the privacy of your Facebook account.
The first thing you should do to make your Facebook information more private is to change who can see your future posts.
Navigate to facebook.com and enter your Facebook login details.
Click on the arrow in the top right of Facebook, select “settings & privacy” and then “settings. ”
”
Once in the settings, select “privacy” in the menu and look for the section called “who can see your future posts?” under the section labeled “your activity.” Here you can choose who can see your posts: just your friends, a specific subset of your friends or only you.
Once you’ve made your future posts more private, it’s time to undo any privacy mistakes of the past and hide posts you’ve already made as well. There are two ways to do this: in bulk or manually for each individual post. First we’ll cover how to do it for individual posts.
Use a web browser to open facebook.com and enter your Facebook login information.
Click the arrow in the top right of the Facebook window, select “settings & privacy,” followed by “settings” and then “privacy” in the menu you’re redirected to.
Under the “your activity” section you’ll see a menu entry called “review all your posts and things you’re tagged in.” Click that and you’ll be redirected to a new page.
By default, you’ll end up at an overview of everything you’re tagged in. Since you’re looking for your own posts, select “your posts” in the menu on the left, which will bring you to a full list of all your posts. From here, you can click on the three dots next to each post and choose to hide them.
If you’d rather just limit the audience for all your past posts and photos all at once, you can do that too.
Start by going to facebook.com in your web browser and enter your credentials to access your account.
Click the arrow in the top-right corner of the Facebook window, click “settings & privacy,” then “settings.” This will take you to a new page with a menu on the left side of the screen. Select “privacy” from that menu.
Find the section labeled “your activity” and the entry inside called “limit the audience for old posts on your timeline.” Click on this and then the button that says “limit past posts.” This will bring up a confirmation window warning you that this can’t be undone in bulk. If you’re sure, click on “limit past posts” again.
Making your Facebook profile as private as possible is a somewhat cumbersome process, as you’ll need to individually specify who can see all the different types of information tied to your profile page.
Visit facebook.com using a web browser and enter your email address and password to log in.
Once logged in, click on your profile picture and first name near the top-right side of the browser window. This will take you to your profile page. From here, click on the “about” section that sits in between “posts” and “friends.”
From here you need to go through each different category, such as employment information, education, places you’ve lived and so on and click the little icon that either looks like a globe or a group of people on each entry. There you can pick whether the selected information is visible to everyone, only friends, a specific list of people or only you.
Few things are as blatantly harmful to online privacy as facial recognition. Facebook uses this to automatically identify you in pictures, including those that others post.
However, on Nov. 2, 2021, Facebook announced it would end the use of facial recognition, with that change being complete by December. Until then, you can turn off facial recognition with the following steps.
Open your web browser and navigate to facebook.com where you can enter your login credentials.
Click the arrow in the top-right corner and select “settings & privacy,” then “settings,” which will open up the full Facebook settings menu. Select the “face recognition” option in the menu on the left side.
Here, simply click on the “edit” button and select “no” from the dropdown menu that appears.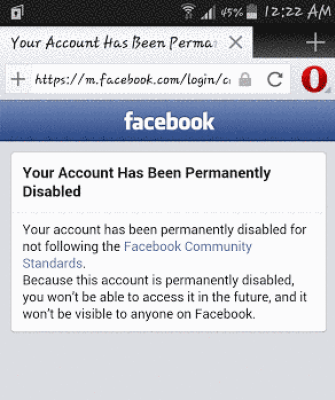
You can’t really make check-ins completely private. This is because check-ins post to the page of the location or business you’re checking in to, as well as your own profile page. What you can do is hide the section on your profile that shows your past check-ins — here’s how.
Open up the web browser of your choice and go to facebook.com where you can log in to your account.
Click your profile picture and name near the top right of the browser window which will open up your Facebook profile. From there, click on the section called “about.”
Scroll down to the section called “check-ins” and click the button with three dots. This will give you the option to hide the check-in section on your profile.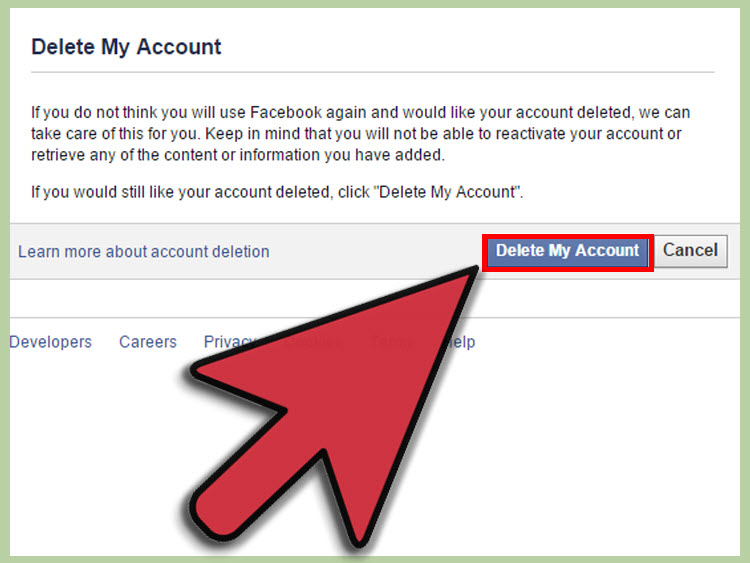
Unfortunately, it’s no longer possible to make yourself completely unsearchable on Facebook — not even if you change all the settings to “only me.” If someone uses your name to find you, you’ll always appear somewhere in the search results. What you can do is decide whether or not people can find you using your email address or phone number, and here’s how you do that.
Use a web browser to open facebook.com and enter your email address and password to log in.
Click on the arrow in the top right, select “settings & privacy,” followed by “settings” and then finally “privacy” in the menu that appears on the left side of the screen.
Scroll down to the section labeled “how people find and contact you” and look for the entry that says “who can look you up using the email address you provided?” Click that and you’ll see a dropdown menu where you can choose between everyone, friends, friends of friends or only you.
In the same section as the previous step, find the entry called “who can look you up using the phone number you provided?” Click that and you’ll get an identical dropdown menu where you can restrict this setting to everyone, your Facebook friends, friends of friends or just you.
Another part of your online life that you might want to keep private is who your Facebook friends are. To do this you’ll need to limit who can see the friends list on your profile page.
Go to facebook.com and log in using your email address and password.
Click the arrow in the top-right corner, select “settings & privacy,” then “settings” and finally “privacy” once you’ve been redirected to the “settings” menu.
Scroll down to the section called “how people find and contact you” and find “who can see your friends list?” Click it and select the option you want in the dropdown menu.
If you’ve ever googled your name, you might have noticed that one of the first results that pop up is your Facebook profile. Depending on how common your name is, this can make your online presence very easy to find for just about anyone. Luckily you can disable this in just a few steps.
Open up facebook.com in a web browser and log in using your credentials.
Once logged in, you can click the arrow in the top right of the window, select “settings & privacy” followed by “settings.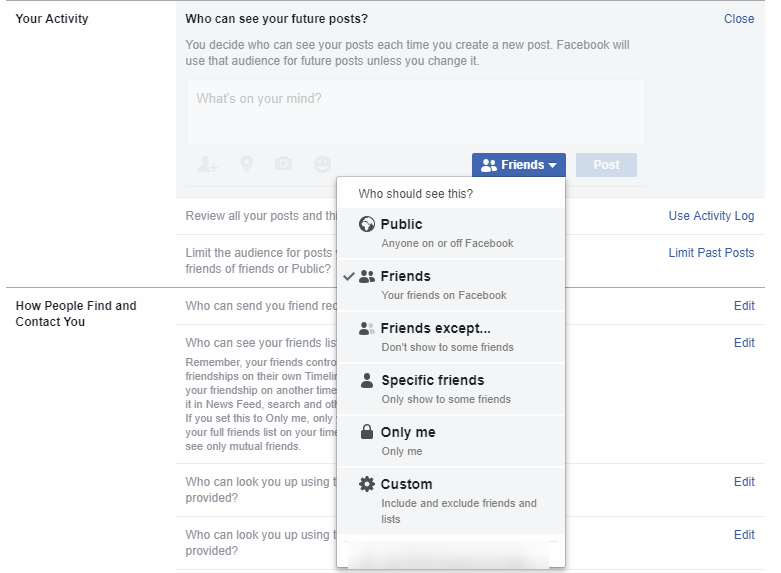 ” This will bring you to the main settings menu, where you need to select “privacy” on the left-hand side.
Scroll down to the section called “how people find and contact you” and find the line that’s labeled “do you want search engines outside of Facebook to link to your profile?” Click it and deselect the checkbox inside. A confirmation window will open; click “turn off” to confirm.
Another thing you can stop people from seeing on your Facebook profile are the pages, people and groups that you follow.
Go to facebook.com and enter your credentials to log in.
Click the arrow icon that sits in the top-right corner of all Facebook pages. Select “settings & privacy” and then “settings.” This will bring you to the main settings panel for your Facebook account. Choose “privacy” in the menu on the left.
Scroll down to the section called “your activity” and click on “who can see the people, pages and lists you follow?” This will bring up a dropdown menu where you can choose between everyone, your Facebook friends, a subset of your friends or just you.
It’s not uncommon to get flooded with random friend requests — usually from bots — if you don’t limit who can send you requests. Here’s how you make sure not just anyone can ask to be your friend on Facebook.
Go to facebook.com and enter your login credentials to access your account
Click the arrow in the top-right corner, select “settings & privacy,” then “settings” and finally “privacy” in the new menu that opens on the left.
Scroll down to the section called “how people find and contact you” and look for the entry labeled “who can send you friend requests?” Select the option you want from the dropdown menu, whether that’s everyone or just friends of friends.
Apps and websites that you use Facebook to sign in to will keep collecting your data long after you stop using the service in question. Therefore, it’s a good idea to routinely revoke app and website permissions.
Use a web browser to visit facebook.com and log in using your details.
Once in the settings menu, select “apps and websites” in the menu on the left side. This will bring up a list of all your app permissions, as well as a button next to each one to remove them.
Ads are the primary reason Facebook wants your personal information to begin with. For that reason, it makes sense to restrict your ad settings as much as you possibly can.
Navigate to facebook.com using any web browser and enter your credentials to log in.
The first ads page you’ll see is a list of ads you’ve been shown recently. You can go through these and hide specific advertisers if you’d like, or keep going to the next step to change your ad settings.
With that we’ve reached the end of our Facebook privacy guide. As we’ve mentioned already, those actually concerned with their online privacy should stay as far away from Facebook as possible. However, for many the service has become a necessary utility and if that’s the case for you, you should at least do everything you can to make your account as private as it can be.
Be sure to check out our piece on Facebook’s rebrand to Meta, too.
What did you think of our instructions for how to make your Facebook private? Were they clear and easy to follow? Do you think we missed some crucial privacy settings? Let us know in the comments below. Thank you for reading.
Let us know if you liked the post. That’s the only way we can improve.
You have full control over your Facebook account privacy. Just like making an account private on Instagram, Facebook doesn’t have a simple button to let you do that. While it’s a big social media giant platform, there are hundreds of settings and each one needs your attention, especially when it comes to our privacy on social media. Some settings are confusing and some are easy to control. However, from now on, you won’t have much but you will manage your account privacy in seconds.
If you do know facebook a little bit, then I will not waste your time. Let me show you one quick setting, which is Facebook Privacy Shortcuts. You can simply get there and follow the onscreen instructions one by one. The Privacy Shortcuts option is available under Settings and Privacy in the Menu. However, if you wanna follow along, then follow me. At the end of this article, you will make your Facebook account or profile as private as possible. So, let’s get started…
Table of Contents
Facebook Privacy Shortcuts is the tool you need to control your privacy and make your account private. To access the tool, Go to Menu then click Settings and Privacy, and then Privacy Shortcuts. Go through each setting one by one to quickly manage things over there and make your account private.
If it is just about a message, then go ahead and manage your Who can Message Me settings. However, you can make any changes and revert back if you want to. By the way, here is the Facebook Stories Privacy Settings Guide. Thus In this part of the article, I will show you how to make your Facebook account or profile private as much as possible. So, please follow me along:
In the latest Facebook app update, there is a lock profile option. You can simply lock your Facebook profile to make it completely private in 2023. Here is how to private Facebook account:
Related for You
In the Facebook app, tap Menu (three lines at the top right). Go to Settings & Privacy then Settings. Now tap Profile Settings and select Profile Locking. Tap the Lock Profile button, and that is it. You are good to go. Now your Facebook profile is completely private.
If you wanna take manual steps for each and every section to extra privacy on the platform then follow simple steps…
When someone first visits your profile on Facebook they see what you share publically, for example, Your About Information. The Your About section includes Bio, Your Intro, Hobbies, Account Overview, work, and Education, Place You Lived, Contact and Basic Info, Family and Relationship, Details About You, and Life Events. The about section further includes your phone number, email address, Gender, Birthday, etc. However, you can make the About Info your Facebook profile private by following these steps:
Go to your profile on Facebook. Then click the Edit Profile button. Now click Edit Your About Info and select each category under the About one by one and then click the Globe (Public icon) next to each sub-category. Now click the “Only Me” option for every setting there you wanna make private.
For example, If I want to make my phone number private, then I will click the Overview section under The About section and then Globe (public icon) next to my Phone Number. I will then select the “Only Me” option and that is it.
How to Make Your Facebook Profile About Section PrivateFacebook lets easily hide or private your friends list on the platform. But each of your friends is responsible and the only manager to manage their own friend lists on their timelines. Thus you can hide your friend list by following this method:
Click the dropdown menu icon at the top right, then click Settings & Privacy, and then Settings. Click the Privacy tab at the left sidebar then the Edit option next to “Who can see your friends list”. Select Only Me and you are good to go.
Hide Your Friends List On FacebookYou are the only owner and responsible person for your posts on Facebook. So you can decide who can your future posts are on Facebook, you can also set the option to Only Me to stop anyone from seeing your future posts. However, the suggested option you may wanna set is “Friends”. Here is how to make your Future Posts Private on Facebook:
Go to facebook.com/settings. Now click the Privacy tab on the left sidebar. Click the Edit option next to Who can see your future posts under the Your Activity section. Set the option to Friends only or Only Me and done. This action will make your future posts private on Facebook.
You can easily limit the audience for your published or shared posts on your Facebook timeline. Unfortunately, you cannot make your shared Facebook posts completely private. Thus you can limit the audience for them. This will set the audience for those shared posts to Friends only. Here is how to do it:
Go to Settings on Facebook, then click the Privacy tab on the left sidebar. Now click the Limit Past Posts option under your Activity section. Then click the Limit Past Posts button. Moreover, you can go through each of your shared posts one by one and set a different audience for them.
Hide or Limit Your Published PostsFacebook lets anyone find you via your email address or phone number. I have told you how to hide your phone number in the About section but what if someone is searching for you by other methods on Facebook? Well, there is a setting you need to manage to stop others from finding you on Facebook. In short, you can make your Facebook profile unsearchable. You can stop people look you up using your email address and phone number, using this method:
Go to Settings then click the Privacy tab on the left. Now in the “How People find and contact you” section click Edit next to “Who can look you up using your email address” and set the option to Only Me. Then click Edit next to “Who can look you up using your phone number” and set the option to Only Me.
Make Your Facebook Profile UnsearchableMoreover, to stop non-friends from sending you friend requests, click the Edit option next to “Who can send you friend requests” and set this to Friend of Friends. However, people who know your username on Facebook can still find you.
Facebook lets you manage your profile and tagging privacy on the platform. Furthermore, there are three sections you can manage to make things on your profile private and manage some tagging settings. Viewing and Sharing settings for your posts, Tagging, and Reviewing Things before they appear on your profile. Go to Settings then Privacy follows the below methods.
You can easily stop others on Facebook to share posts on your profile. Also, stop them from seeing what other people posts on your Facebook profile, and don’t let them share posts as your stories. However, Set the options for each setting as below:
Some friends on Facebook can tag you in their posts. Then those posts appear on your profile. You can stop people to see those posts on your profile you’re tagged in. You can make such posts private using this method: Go to Settings then the Privacy tab navigate to Tagging section. Set the options as below.

The most interesting part, when someone tagged you in their posts, you can review such posts before they do appear on your Facebook Profile. You can also review tags people add to your posts before that specific tag appears on Facebook. However, set the options as below:
Now you are in full control, you can easily review everything before appearing on your Facebook timeline or profile. Moreover, the above are the best options you can set to make your Facebook profile private as much as possible.
Profile and Tagging Privacy SettingsFacebook is the best place to make friends around. Thus you may follow your friends and family members, pages, and favorite celebrities online on Facebook. Then you don’t wanna let others know about anyone, any page, etc you follow. Here is how to make pages, people, and lists private:
Visit the Settings page in your Facebook account. Click Privacy at the left. Under the “Your Activity” section click Edit next to “Who can see people, pages, and lists you follow”, set the option to Only Me, and done.
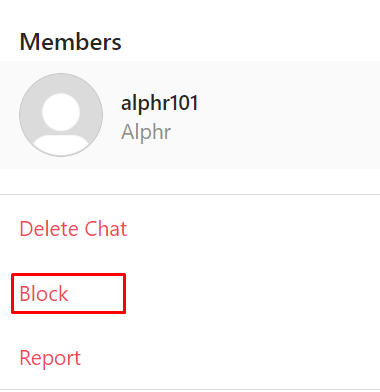
Make People, Pages, Lists You Follow PrivateIf you wanna make your Facebook account private because of some annoying friends. Then don’t, you can simply block them and Facebook will make your full account private to them. They won’t be able to find you, see things you are sharing, etc. However, later on, you can unblock them if you want. Here is how to block them:
Block Annoying Facebook FriendsGo to any of the friend profiles you wanna block. Then click click the three-dot button under their profile name. Click the Block option to block that friend, that is it, this is how you can block some annoying friends on Facebook.
It’s easy to find if a profile on Facebook is private. First, visit the person’s profile, if you don’t see information like his bio, description, friends list, interests, and related stuff. Even you may see his profile picture. Then consider that is a private profile on Facebook. It is that simple, you can make your profile private too, just follow the best privacy settings mentioned above.
Help Center
We are updating the mobile version of Facebook.com. More
Open profile
This feature is currently only available in some countries and on certain devices.
If you see the icon on a person's profile, it means they have closed their profile and restricted access to their content to people who are not on their Facebook friends list.
When a person closes their profile, only their friends see the following content:
Profile photos and publications.
Full size profile and cover photos.
Stories.
New publications and photos.
Also:
Any public posts that this person has previously shared will only be visible to their friends.
The profile and label verification function will be enabled.
Information from the "Information" section of his profile will only be partially visible.
Other ways to manage privacy
If you are unable to close your profile, manage your privacy using your privacy settings:
Use the privacy check.
Select the audience for the publication.
Edit basic profile information and choose who will see it.
Change history privacy settings.
Enable the profile check feature.
Apply the mark check function.
Enable profile photo protection.
Manage settings for adding friends and subscriptions.
Choose who can find your profile using your email address and mobile phone number.
Was the article helpful?
Who is viewing your Facebook profile?
Profile Transparency section in Professional Mode
How do I enable profile photo protection on Facebook?
Blocking Facebook profiles
How do I report a Facebook profile?
Information
Confidentiality
Conditions and rules
Advertising preferences
Vacancies
COOKIE
Creation
Create page
90,000 how to hide all information about yourself in Facebook - AIN.UA18 18, 18000 18 March, 2015, 15:00
219585
Social networks know much more about the habits and lives of their users than their parents or even spouses. This is not a very pleasant fact, because all this information is available not only to advertisers, but also to your competitors and enemies. In the lives of many people, there are situations when it is necessary for some time to disappear from the public space and go into the shadows. Facebook does not have a built-in ability to delete all your posts and photos, but you can hide them from prying eyes for a while. Business Insider journalists described a sequence of actions, as a result of which you can hide Facebook information, and the user's previous activity will be hidden.
In 2021, the editors of AIN.UA updated this text. 6 years after its publication, Facebook has simplified the procedure for hiding all information about yourself from Facebook and switching to "invisible mode". In addition, there was also a function to delete posts for a certain period. In the updated material, we tell you how to do it.

 For each of the items, indicate "Only me", and also prohibit others from sharing your publications in their stories. Repeat the steps on the Tags tab. If you want to check the posts you're tagged in before those posts are shown on your profile, set the appropriate settings on the "Verification" tab.
Recall that recently Facebook has seriously taken care of the problem of cheating likes on brand pages and announced changes to their counting system. Soon the social network will remove "likes" from users whose accounts have been deactivated. This applies to deceased users and to those whose profiles have been deleted for violating the terms of use of the social network or due to prolonged inactivity.
Login / register
or
Remember me
By clicking "Login/Register" you agree to the terms "User Agreement" AIN.