By Zoe | Follow | Last Updated
English
Facebook is a social networking site where you can share your thoughts and express your feelings. After publishing countless Facebook posts, sometimes you might regret posting them and want to delete all of them. This article will show you how to delete all Facebook posts.
Now, let’s take a look at how to delete all Facebook posts. (To make a Facebook slideshow, try MiniTool MovieMaker.)
This part is going to tell you how to delete Facebook posts on computers and mobile phones and how to delete Facebook posts all at once.
To delete your old Facebook posts in a web browser, follow the below steps!
Step 1. Go to the Facebook website and log into your account.
Step 2. Go to your Facebook profile by clicking on your profile picture in the top right corner of the window.
Step 3. Click Manage Posts and then check the option Select All. After selecting the posts, click Next > Delete Posts > Done.
Please note that Facebook only allows you to delete posts up to 50 at a time.
The Facebook mobile app not only allows you to delete posts but also enables you to archive and restore content.
Here’s how to delete all Facebook posts on your mobile phone.
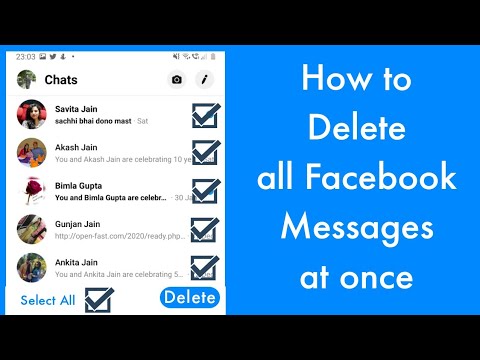
Step 1. Open your Facebook app and tap the Menu button located in the bottom right of your screen.
Step 2. Click See Your Profile > More (the three dots icon) to get the Profile Settings.
Step 3. Then choose Activity Log > Manage Your Posts and you will see all your posts.
Step 4. Select the box All and tap the Trash button to delete all your Facebook posts.
Note: The deleted Facebook posts will stay in the trash for 30 days before being permanently deleted.
Also read: 3 Easy Ways to Download Facebook Video to Computer
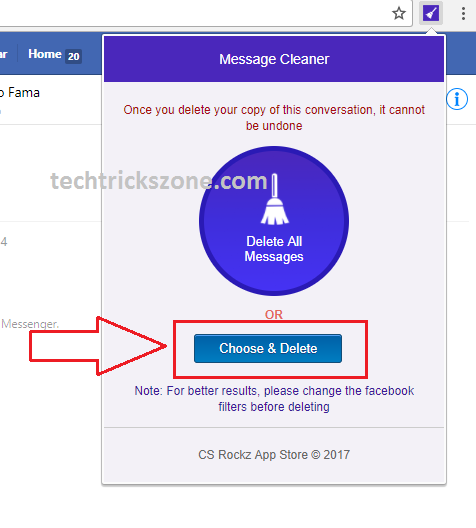
Do you want to delete all Facebook posts at once? Try this extension – Delete Social Media Posts, Photos, etc. It’s a paid extension that can help you quickly delete all your Facebook posts, photos, messages, and other activities without deleting account. This extension can also delete Twitter tweets.
Here’s how to delete all Facebook Data without deleting account.
Step 1. Launch your web browser and install the extension “Delete Social Media Posts, Photos, etc.”
Step 2. Open the Facebook web app and go to Activity Log.
Step 3. Then you can choose Delete Posts/Photos to delete all your Facebook posts/photos.
If the Manage Your Posts option doesn’t work, you can find the post you want to delete and click the three dots. From the drop-down menu, choose Move to trash to delete the post.
Before deleting all your Facebook data, you may want to download them from Facebook.
Here’s how:
Step 1. After opening the Facebook website, click the down arrow icon in the upper right corner.
Step 2. Choose Settings & Privacy > Settings.
Step 3. Next, select Your Facebook Information and click View next to Download Your Information.
Step 4. On this page, you need to select a data range first. Then check what you want to download. Change the media quality and format based on your needs and press the Create File button.
Step 5. Once the file is created, switch to Available Copies and click Download to save the copy of your Facebook information.
Also read: Everything You Want to Know About Reels on Facebook
That’s all about how to delete all Facebook posts and how to download a copy of your Facebook data.
Ivan covers Big Tech, India, policy, AI, security, platforms, and apps for TNW. That's one heck of a mixed bag. He likes to say "Bleh." Ivan covers Big Tech, India, policy, AI, security, platforms, and apps for TNW. That's one heck of a mixed bag. He likes to say "Bleh."
Welcome to TNW Basics, a collection of tips, guides, and advice on how to easily get the most out of your gadgets, apps, and other stuff.
We were all stupid once. So, there’s no shame in admitting that we might have a ton of silly Facebook posts from when we started using the social network. We might not want everyone to see them, so Facebook lets you archive or delete them in bulk.
Before we get started, the bulk delete/archive functionality is currently only available on Facebook’s mobile apps (Android, iOS, and Lite). So, make sure you have one of the versions before you start.
The heart of tech is coming to the heart of the Mediterranean
Join now
The procedure for deleting old posts is similar for all three apps. So that’s a bonus. Here’s how you can do it:
Deleting or archiving old Facebook postsAll archived or deleted posts will show up as labels in Your Posts sections. You can tap those labels to see your archived or deleted posts.
Facebook will retain your posts in the recycle bin for 30 days in case you deleted a post by mistake, and want to restore it. It’s a bummer that there’s no option to bulk delete posts on Facebook’s desktop site. Hopefully, the company will roll out this feature soon. Till then, you can hide all of your sins under the carpet through mobile apps.
Life is pain. And if you don’t see the expediency of sitting your pants at the monitor, or pirated content pisses you off, you can try to “find happiness” without a current account. The following describes how to properly leave Facebook so that you can return.
0011 temporarily - deactivate the profile;
Useful article: Which is better - macbook or laptop for work and study
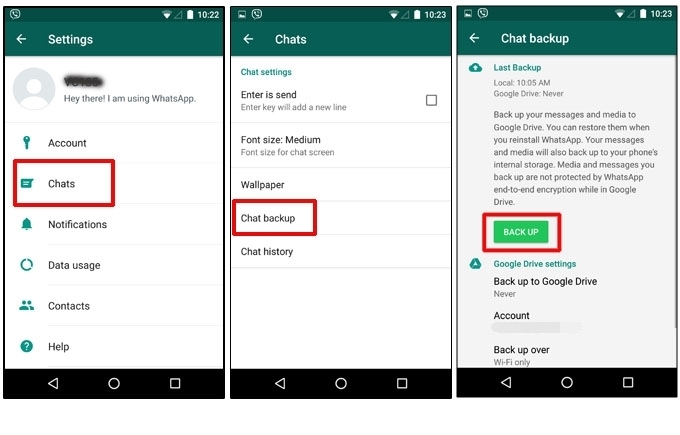
Before deleting an account from Facebook forever, you should understand the difference between deactivation and deletion. Perhaps you can get by with the first method: it gives you a chance to change your mind. The key difference between the two states is in the table.
Deactivation is suitable for those who want to "take a break from the Internet". The most affordable way to do this is to temporarily leave social networks. nine0003
To deactivate, follow these steps:

At the same time, by going to the site under your login, you can restore the page with all your content. It does not matter how much has passed since the moment of departure - a day, a week, a month. All personal user data will be restored from the cloud.
Read: How to check the camera on a laptop: 3 ways to turn on and check
Those who want to remove all traces of their stay on the Internet will have to work hard. Required:
And only after these steps you can proceed to the final deletion of the profile. So, and only in this way will it be possible to leave the social network. And mentally prepare for the fact that the “cloud” will store data about the page for some time.
If someone wants to look for compromising information on a user, he will do it on indirect grounds. Therefore, you should never, ever enter into dubious online ventures and regularly back up your data. The Internet remembers everything that happened in it! Even what has already been liked .
Note: How to choose a good inexpensive laptop according to 4 criteria - tips from professionals
It is more convenient to use social networks from your smartphone. It gives freedom of movement that cannot be supported with a laptop. What to do if you need to delete an account from Facebook, and only a mobile phone is nearby?
The easiest way is to download the official application and follow these steps:

Internet addicts: How to distribute the Internet from your phone - a manual in 3 points, how to turn a smartphone into a router
Can this be done on a smartphone without downloading the application? Yes. You just need to log in to your profile and follow the instructions.
 " nine0012
Getting rid of an account using the application is much easier. But for those who want to play it safe, you can try two methods in a row. If you can’t access your page when you re-enter through the browser, then everything went well. nine0003
Those who decide to delete their account using a computer need to perform almost the same steps as when leaving through the web version on a mobile phone. It is advisable to download the archive with your data. After deleting the profile from backup storages, all content from the “face-book” disappears: photos, dates of birth of loved ones in synchronized calendars, etc.
This is the only legally secure way to see the "digital footprint" within the social network. What should be done. nine0003
Informative article: Which of the 2 brands is better - Xiaomi smartphones or iPhone: comparing phones by 5 parameters
Depending on the amount of data, the audit period can take up to a week. At the end of the collection of information, the service will notify you of the end by an incoming letter to e-mail. Next - the algorithm of actions is as follows:
 nine0012
 To understand your digital footprint, it is recommended that you check at least once a year. So you can find out how the social network “sees” the profile and why it slips certain formats into the recommendation feed.
To completely remove from the "brainchild of Zuckerberg" you will need:
The page will then be permanently deleted. Even with a strong desire, the owner will not be able to restore account management. Personalized information disappears from the server as if it never existed.
Therefore, before deleting a page, you need to weigh your decision. Clicking the mouse “by mistake” in the wrong place can lead to irreparable consequences.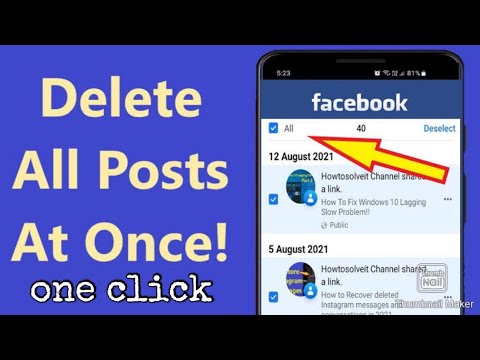 The social network offers two ways to solve the problem of "freedom from the Internet":
An interesting article: Which is better - Xiaomi or Huawei smartphones: comparison of top phones by 10 parameters You can find info by likes and comments in the “digital footprint archive”.
It is necessary to distinguish between the concepts of an account and a page in social networks. One account can administer several related child accounts: an interest group, a public page, a public, etc. To get rid of such a "treasure", it is not necessary to delete the main profile. The instruction is the following.
 nine0012
 This will make the page inaccessible to everyone. Links to it will no longer work. Commenting on old posts will become impossible, and subscribers will see a stub picture on the side. According to it, they will determine the "dead" page. Unblocking back will not work - the information simply will not be on the server.
Read: How to connect your phone to a projector via WiFi - a 3-point guide and a list of 7 best apps
If you want to remove a page from a specific gadget (for example, from the iPhone X), and not delete it, you should do a few things. Then this problem will not turn into a disaster. After all, the factor of forgetfulness has not been canceled: sometimes you forget to disconnect from your work computer. And it’s impossible to put up with it, the profile stores private information and a network of useful contacts. I do not want to disturb the owner of another gadget. What if he decides to watch something private out of pure curiosity? nine0003
Instruction article: How to connect your MacBook to a TV or monitor: 7 effective tips
Do not rush to click on "delete". It is enough to “knock out” your page from another device. The main thing is to save access to the page on one of your devices, and remember the password to your account. Further, the algorithm of actions is as follows:
This is a universal way to revoke access from third-party devices to a profile on the network. Then the current page will disappear from unwanted devices.
Authorization is required only from verified gadgets. Of those where you are sure that the administrator will not be spying. After all, no one has yet canceled screen recording on other people's devices. nine0003
Read: How to properly charge your MacBook - 5 tips and answers to popular questions
Facebook has become so integrated into everyday life that it can be difficult to count how many applications use it as a means of authorization. Activation saves a lot of time. But this is how developers get access to all the key information of a person's profile: name, age, email, friends, etc.
This is especially true for those who have decided to leave the social network. If you skip this step, the developers will still have access to the data. This "vicious circle" can be broken in the following way. nine0003
The list of sites where the user has authorized through his account will appear on the screen. To refuse the service, clicking on the crosses in Fb is not a solution to the issue. You need to go to each of these sites and reconfigure the authorization method to any other. Yes, this will require a lot of work on the keyboard. But strangers will not receive a bit of information.
Interesting article: 10+ best smartphones with wireless charging
If you cannot change the login method, you need to write to the application technical support. They are obliged to help find alternative ways to solve the problem.
And only after authorization has been reconfigured on all sites, you can start disabling applications from your account. It's not necessary, but it doesn't hurt to be safe. To completely disable running applications, you need to perform the following steps.
Now all user information in these programs cannot be recovered, and developers will lose access to Facebook ID. However, it should be understood that the information provided earlier will remain in the database of the third-party service. nine0003
If deleting this data is vital, you should contact application support directly to request that all personal data be deleted from their servers. As a rule, conscientious companies appreciate the attitude of customers towards themselves and will go to a meeting. Especially if they are located in Europe - there the law forces businesses to delete user data “like paper shredder” after his request.
It will be more difficult to erase all your data from Instagram even after fleeing Fb. It should be remembered that these social networks are in the same corporation. Therefore, even after deleting a Facebook profile, some of the data will remain on Insta's servers. nine0003
Note: Connecting a smartphone to the projector: 6 working connection options for IOS and Android
To run ads on Facebook and Instagram, users create a special cabinet inside Facebook. When you finally leave the social network, you will also have to delete the advertising account.
Deleting the account is also recommended for those who will no longer run ads on their page. Inaccessibility of financial data will prevent possible crimes of hackers. Intention to delete an ad account will result in the following results:
Clash of the Titans: Which is better: iPhone or Samsung - which of the 2 smartphones to choose?
What are the requirements for deactivating the account:
 After paying the balance, all credit card data (including payment history) will be deleted. As a rule, all this happens within 2-3 days - it depends on the speed of the bank's calculators. nine0012
 It will not work to activate the cabinet back from the bay: it must meet the requirements above. These are the conditions of the social network to prevent financial violations.
To delete an advertising account, you need to perform the following steps.
Useful article: Which MacBook to choose in 2019: review, comparison, reviews
The most popular reasons for refusal to close the advertising account are actually buried on the surface.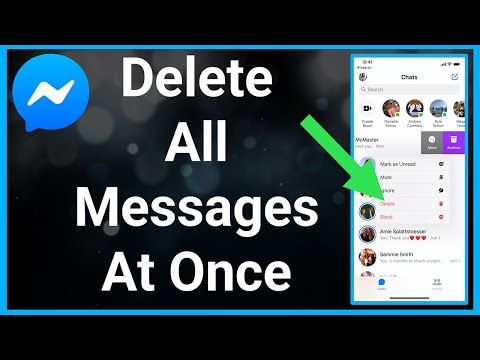 They are associated with insufficient rights to manage an advertising account and financial debt. The main reasons are summarized in the table. nine0003
Important: you cannot enable an account if it was deactivated due to a change in currency or time zone.
Deleting Facebook is as easy as erasing a pencil on paper or removing a bad drawing layer on an iPad. The main thing is to know the tricks of erasing the "digital footprint". Understanding them, you can really leave Facebook forever. And then no social networks will distract from important matters!
Stories
Stories
Alexey Zenkov
History Direction Editor
Alexei Zenkov
Facebook has a terrible habit of reminding you of everything you've ever posted. Most likely, in the dark corners of your Chronicle there are many records that you no longer remember. It's time to remove them once and for all. nine0003
Alexey Zenkov
First of all, make sure you know how your Timeline is seen by regular users (those who are not your Facebook friends). To do this, go to your Timeline, click on the lock icon, in the "Who can see my materials?" select "View As" and you will see the following:
Okay, review everything, and if you don't like something, click on the date under your name, then on the globe icon, and change the item "Public" to "Friends ”, “Only Me”, or “User Settings”. In addition, you can completely delete the entry by selecting the appropriate item after clicking on the arrow in the upper right corner. nine0003
If you want to hide many public posts at once, you'll be surprised that Facebook has a dedicated tool for this.
Click on the privacy settings padlock in the upper right corner of the page, select "See other settings" and click "Restrict access to previous posts." Read the message that appears and click "Apply these restrictions to past posts" if you want only friends to see all your old posts. nine0003
Next, let's make sure that the Chronicle settings match your preferences. Click again on the privacy settings padlock in the upper right corner, select "See other settings" and click on the "Timeline and Tags" tab in the left panel.
Make sure the first, fourth, fifth, and seventh items are set to "Friends" or whatever you choose:
If these tips are not enough for you, you can use one of the extensions for the Chrome browser, such as Facebook Post Manager. However, such programs can be overly aggressive, so be careful when using them.
Done! You have cleared your Timeline of old forgotten posts.